
Measurement Methodology
This page describes how the bench measurements in this guide are taken. I do not have the equipment or expertise for lab-grade measurements. But even field-grade standardized comparative measurements can give useful insights.
Physical Characteristics
Test Equipment
- I measure weight using an Escali digital kitchen scale.
- Linear measurements are taken using an iGAGING 100-700-33 digital caliper, which has a max distance of 100mm.
- For linear measurements greater than 100mm, I use a PEC Tools metal machinist ruler.
Standard Test Conditions
- Linear dimensions are measured and recorded in millimeters.
- Weights are measured and recorded in grams, and converted on display to also show in ounces.
- I record the weight of the radio with no accessories, no antenna, and no battery.
- I also record the carry weight, which includes the radio, the lightest included antenna, and the lightest included battery, but no other accessories attached.
For the linear dimensions of width, height, and depth, I measure the distances of an enclosing box. See Width, Height, and Depth. for more information.
Transmit power
The practical difference between a manufacturer stated 5W transmit power and a measured 4.23W transmit power is negligible. The geography and your antenna probably make a bigger difference in how well you are heard by others. Nevertheless, testing actual power output can give some useful insights into radio performance.
Test Equipment
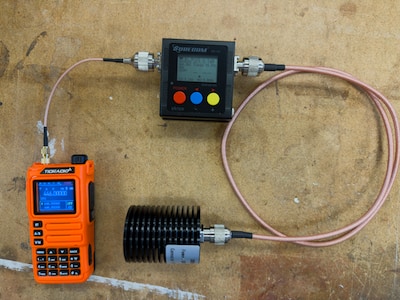
- A Surecom SW-102, a well built and commonly used VSWR and power meter. My SW-102 has type N connectors.
- An XRDS-RF 50W 50 Ohm Dummy Load. This also has a type N connector.
- Various adapters and short jumpers so I can connect a handheld to the SW-102. For the precision we achieve, the type of cable and the grade of connectors is likely not relevant. The most commonly used jumper is 6 inches long and made of RG316.
Standard Test Conditions
- All measurements for a radio are taken in a single session using the same cables and adapters.
- I use the battery that was included with the radio, and ensure it is fully charged at the beginning of the test.
- I record and report the values displayed on the test equipment; I don't round or truncate.
Frequency Selection
This guide reports transmit power by amateur radio band (or service, like GMRS). Each band covers a range of frequencies, and you have to select one frequency to test power output. Here are the frequencies I use for each band, and a description of the rationale for the frequency selection:
| Band | Frequency | Rationale |
|---|---|---|
| 6m | 52.525 MHz | Commonly used calling frequency for FM, and close to the middle of the band. |
| 1.25m | 223.500 MHz | Calling frequency near the center of the band. |
| 2m | 146.520 MHz | This frequency is in the middle of the band and (should be) commonly used. |
| 70cm | 446.000 MHz | This band spans 30 MHz, but the lower frequency portion of the band is not commonly used by handheld radios. We choose the simplex calling frequency, but it also happens to be in the middle of the repeater inputs and outputs part of the band. |
| GMRS | 462.675 MHz | GMRS channels are either in the 462 MHz or 467 MHz neighborhoods. We choose 462.675 because it's the commonly used calling frequency (GMRS channel 20). |
| MURS | 151.940 MHz | MURS 3 is the closest to the midpoint of the 5 MURS channels. |